Tuesday, June 18, 2013

The Eve of My NCLEX

As this blog is named The Nutso Life of Nurse Liz, I figured it was about time to talk about something nursing related. Funny thing is, I'm not actually an official nurse yet. In fact, my registered nursing fate shall be discovered within the next 48 hours. At two o'clock tomorrow, I'll sit for the dreaded NCLEX. With over $200 down the drain to take this test, I'm obviously hoping beyond hope that I pass. The results are to be determined...and I'll add in a little update when I find out!

But besides that main point above, I really just wanted to whip a post up to share how excited I am about life. Yes, life in general. I have so many amazing things to look forward to.

  • Andrew McMahon Concert: This may seem a little foolish to some, but I'm literally jumping around right now as I think about the amazing time I shall have when July 11th comes and I get to see this amazing man live one more time. I am sometimes speechless when people ask me why I love this artist and human being so much. Or else I say something like, "He's just...amazing," and get this ridiculous grin on my face. I'm sure all you guys understand when it comes to an artist, author, actor, etc. that you adore as I adore him. Anywho, can't wait for this show!
  • Nursing Orientation: As long as I pass my boards, I'll be starting my orientation on July 15th! It's gonna be crazy and hectic and difficult and wild and fun and I can't wait! I'll be working on the floor where I'm an aide now, and I'm super excited to remain with my coworkers and learn from them. Of course, my excitement also extends to having my first "adult job." Yippee!
  • New Apartment: In July, I'll be moving apartments. From living in the dorms for my first two years of college to living with the same roommate (and amazing friend) for the past two years in our apartment, this is going to be a big change for me. I'm moving to a new part of town (though it's not really far away from where I am now at all), I'll be living alone, and my apartment will hopefully feel like my own place. Having a college apartment is definitely different from my new place, and I'm most certainly looking forward to decorating, making it my own, having friends over...but not so much the paying bills and all that jazz :P
  • Being an Adult: While I'll still have my parents' support when and if I need it, I'm basically going to be an adult by the end of the summer. That's totally crazy but ridiculously exciting at the very same time. Leaving college and all of those shenanigans behind is definitely bittersweet. I'll miss weekend bar hopping, lazy movie nights, and even the pains of sitting through lectures with my classmates. But at the same time, I'm only 22! If I want to have a partying type of weekend, I still can! If I have the urge to go dancing, I am totally able to! If I want to read a textbook, I certainly could - though I probably won't have such desires. My whole point is, I'm growing up, but that doesn't mean I have to suddenly be a 100% responsible adult. I'm still a kid - sorta.
Can you tell I'm excited about life? Hope anyone who's reading this can steal a little bit of my happiness - there's always enough to share :)

Smiles all around,

Liz :)

Sunday, June 9, 2013

My Top 10 Favorite Nail Polishes

I'm a nail polish addict. As someone who's not really into beauty products, nail polish is one of the rare things I get a little crazy over. To be honest, I have an embarrassing amount of polish - but it's not embarrassing if it makes me happy, right? :P And, sadly, when I see a nail polish in the store that I love, it's really difficult to avoid making the purchase. Keeping all this in mind, I think it's safe to say that I've loved on a lot of polishes...and I have quite a few favorites in my collection! If you're interested in finding out some of my most loved and used, keep reading! :)


Revlon Fearless

This color makes quite a statement, and it's one of the polishes that people consistently ask me about when I have it on. It's bright, bright red with a hint of orange - different than your conventional red in a perfectly wonderful way.


Ulta Little Black Dress

I think dark colors are a fun way to change up your nails, but black can be a little blah for me (I usually opt for very dark blues, purples, greens, etc.). I was excited to find this Ulta polish which is a black with some awesome silvery shimmer. It doesn't appear excessively glittery on the nails, which I like, but it gives the black an extra special pop that catches the eye.


Revlon Sunshine Sparkle

This name makes me happy and describes this nail polish perfectly. Sunshine Sparkle is a pastel, yet bright yellow that has the most beautiful shimmer in it that reminds me of the best summer day imaginable. It's gorgeous on skin with a bit of a tan, though I reach for this polish no matter the month because it's one of those that perks you up and makes you happy.


Wet 'n Wild I Need a Refresh-Mint

The name of this polish is punny, something that I love to begin with. But the color is to die for!!! It's a minty blue that looks amazingggg, especially this time of year. This Megalast line of polishes from Wet 'n Wild are some of my favorite, too. The formula is long lasting, I think the price is under three dollars, and the brush is on the bigger side with a curve to it that makes painting your nails incredibly easy. I also have two other colors from this line: On a Trip (lilacy purple) and Club Havana (awesome creamsicle orange).


Revlon Copper Penny

I'm not one for wearing neutrals on my nails, and this gorgeous color is about as low key as I'll go. It's a rose gold-ish/copper shade that looks amazing once on. It's got the perfect amount of shimmer and catches the light beautifully. If you're not into super bright colors, I'd highly recommend this one!


Sinful Colors Let's Talk

This line of polishes is one of the best bargains at the drugstore! I believe I got this shade for $1.99, and the formula isn't lacking. Let's Talk is a particularly vibrant, bright purple with an awesome sheen to it. It's more on the purple than blue side as opposed to how it looks in the picture above. Definitely makes a statement, but that's exactly the kind of polish that I love and adore!


Revlon Midnight

Midnight is a dark teal which reminds me of the night sky before it's gotten truly dark - so maybe a bit before the clock actually strikes twelve :) It's one of those deep colors that I would typically choose over black as it makes a dark statement while maintaining a fun pop of color at the same time.


Butter London Knackered

As you can probably tell by now, I'm quite the fan of affordable drugstore nail polish. While I have a few more expensive ones in my collection, I generally don't pay more than $6 for a polish. However, when I spotted this Butter London one, I knew I had to shell out the, in my opinion, outrageous price tag. But honestly, it's gorgeous. This shade reminds me so much of all the "galaxy" things you see, transitioning from green to blue to pink to purple to silver with the slightest move of your hand. It's a bit sheer to be worn on its own but pairs perfectly overtop of a dark blue, teal, or purple. Plus, there's a pretty little shimmer that's slight but beautiful all the same.


Pop Beauty Mint Magic

This one is different from the previous minty shade I mentioned in that it's far more green than blue. It's wonderful all the same, giving a bright, fun pop of color to the nails. I've found it to be a tad bit streaky at first, but with a couple of coats everything sorts out :)


Revlon Vixen

I'm not one to coordinate my nail polish colors based on the season (I wear whatever I want whenever I want!), but Vixen is the perfect vampy red for fall. This wine-like shade has a hint of plum to it, making it another fun, unique choice when you want to wear a shade of red on your nails.

And there you have it! Though I'm sure I'll find a new favorite in no time, the above are some of my most loved and adored nail polishes. I think I have one for every possible occasion I could get myself into, but there's always room for more when it comes to nail polish, right?

Toodleoo,

Liz :)

Sunday, June 2, 2013

Tips and Tricks for Crazy Colored Hair

As promised, I'm following up my last post with this one all about the things I have learned from dyeing my hair funky colors for the past few years. Having dyed my hair blue, purple, teal, orange, red, and lots of colors in between, I'd like to think I've acquired at least a few tips that will help someone who is interested in fun colored hair.

1. Always dye your hair while wearing a shirt or tank top you don't care about. Even if you try your hardest to keep it all on your head, some of the dye is bound to end up below the neck one time or another.

2. Wear gloves if you don't want to have stained fingers for a few days. I don't care if my fingers turn out blue or purple, so I opt out from wearing gloves. However, I still use a brush to apply the color just to keep most of it off my hands.

3. If you do get color on your hands (or on parts of your ears or face), try using a toner or strong makeup remover to get it off. If it doesn't get rid of the dye completely, it will at least fade it a bit. 

4. If you don't want to get color on your face in the first place, try putting Vaseline or something similar along your hairline and ears. Though I don't do this, I've heard that it can prevent the color from transferring to your face in those areas.

5. The best way to go about dyeing your hair, for me, is to dive right into it. If you don't like how it turns out, it will grow out, fade away, or you can dye overtop of it. Part of the fun is adventuring!

6. If you can't find the exact color you want, try mixing! This way, you can get that perfect indigo, teal, aqua, etc.

7. If you really want your hair color to last for a long time, wash your hair in cold water. This definitely sucks (especially in the cold months), but it totally helps with longevity.

8. If you can, try washing your hair in the sink or under the bathtub faucet. This makes it a lot easier to deal with when using icy cold water.

9. For another trick on longevity, try to wash your hair only every other day or so. Less washes = less fading.

10. If you're looking for a hair dye that works wonders with lasting forever even if you don't follow the two tips above, try out Jerome Russell Punky Colour. I swear, they're amazing. I can wash my hair everyday in hot water and though the color fades, it still looks good for at least a month. They're great!

11. Have a towel that you can make your "hair dyeing towel." When you rinse out the dye for the first time, you may have some left behind that will transfer to the towel. And for the first one or two washes, the same might occur. Thus, the hair dyeing towel.

12. Try not to use a lot of heat on your hair. For me, this is easy since I use heat maybe once a month. But, in the past when my hair was longer, I noticed a dramatic difference with the way my color faded when I would straighten or curl it.

13. Try to find a product that will protect your color from the sun. Though I don't use it as often as I should, I've purchased the Paul Mitchell Color Protect Locking Spray. In the summer especially, the sun can drastically fade your bright hair colors. It may not work wonders, but a spray like this will at least help a little.

14. If you're putting colored streaks in your hair as opposed to dyeing your whole head, try dyeing the underneath layers. By this, I basically mean do not dye the very top section of your hair where you part it. In doing so, you won't be able to notice the area which has grown back months down the road and you won't have to rebleach as often.

15. Enlist a friend to help! If you're unsure of yourself the first time around, have a friend there for assistance. Whether it's just to hand you supplies, hold back your hair, or even put some of the dye on, another set of hands can be a huge help!

Adios,

Liz :)

How I Bleach and Dye My Hair

All right, folks. As mentioned in my previous post on my hair dyeing fun, today I am going to tell you all about how I bleach and dye my hair. But, before we get started, there is definitely a little disclaimer I have to make:

I am in no way, shape, or form certified in anything that I am going to talk about in this post. Everything that I have learned about hair dyeing and bleaching has been from watching my hair stylist do it to my hair and from other blogs or posts on the internet. I am not trained in doing hair, and I am not telling you that all of the information below will work for you! Everyone's hair is different, can tolerate different amounts of bleaching, and will take to dye differently. If you want to try out any of my tips or techniques on yourself, feel free but do so at your own risk!

Whew! Now that that's out of the way, let's get started!

So, before putting purple, blue, green, etc. on my hair, I have to bleach it. Because my hair is a very dark brown, the colors that I use will not even tint my hair if I do not bleach it ahead of time. If you are blonde, you might be able to get away with skipping the bleach step; however, that depends on the shade of blonde you are. If you're bleaching your hair for the first time, I would recommend going to a stylist so you can at least watch the process and ask him or her questions.

I use bleaching supplies that I picked up at Sally Beauty.

Plastic mixing bowl, brush, powder lightener, developer

Once you have your supplies, then comes the fun part: deciding what parts of your hair you want to color! Because of my job, I'm unable to have totally out there hair color aka a whole head of bright purple hair. So, what I like to do is put in small streaks throughout the front section. I simply do the front because then I can see everything I'm working with, and I've come to like just having a section of hair that's colored as opposed to going all the way around my head. Now that we've got all that covered, here are the steps to how I bleach:
  •  Combine powder and developer in equal parts, making sure it's mixed well

  • With a comb that has a pointy end, select a thin strip of hair to bleach
  •  Make sure the strip of hair is even and straight for ease of finding the section next time you bleach/dye
  • I find that thin strips of hair work better as they look more natural blending in with the rest of your hair once colored (or at least "natural" or discreet enough that my work never cares about my hair)
  • Using regular aluminum foil, place the hair on top and hold in place 

You'll figure out what size of aluminum foil works for you! I use about twice the size of an iPhone for reference.
  • Paint the bleach on using a brush, making sure to cover every little bit of the hair as well as the backside (it's very important to be thorough)

  • Fold the hair up in the aluminum foil and pin back if necessary

  • Using the pointy end of the comb again, select another even section of hair and push to the side so that it can remain your natural hair color
  • This section can be as thick as you like, working as the in between sections of your streaks
  • Select another thin, even section to bleach, following the process above until you have your desired amount of streaks
  • Allow the bleach to sit into your hair for twenty minutes or so, peeking at the first section you bleached for progress
  • Wash out bleach with shampoo, and you're done!
Ok, so here are some more tips for the process above. Sometimes selecting your sections and putting the bleach on takes longer than you'd like, thus the first section you did is a lot farther along than the last when you're ready to wash out. Because of this, I may wash out half of the sections and leave the other ones to bleach for just a bit longer to ensure an even color. Another super important thing is to make sure you shampoo the bleach out really well. You may even want to shampoo twice just to make sure. If you have any bleach left on your hair, that's a bad thing and the color you'll add later won't stick. Another tip is that you may have to bleach your hair more than once if you have dark hair like I do. The bleach only works 'til a certain point, and it's definitely not a good thing to leave it on for a long time as that will damage your hair quite a bit. As mentioned above, I'm not a professional so I'm not totally sure how long is too long to leave bleach on. But, I start to get concerned after about twenty minutes and thus start to wash it out around then.

So, now you have beautiful bleached hair! Sometimes you can look a little wacky at this point (at least I do)! I think it's a good thing to leave your hair at this stage for a day or two just to give it a break. However, I'm not at all fond of the way my hair looks bleached, so I am bad and usually head right into adding color. Now, here's where the process can change depending on your natural hair color. I used to resection my hair in the way that I bleach, using aluminum foil to separate the sections as I add color. However, I tried plopping the color on the entire front section of my hair once and found that my brown hair took on 0% of the color and was left looking the same as it did before. So, if you dye your hair a lot and don't want to deal with the process, you could try doing that. But, if you have blonde hair or would rather section it off, just follow the same steps as I mentioned in the bleaching segment. Once the dye is in, you simply let it wait to take to the hair.

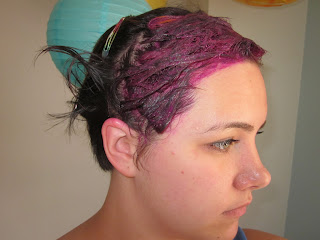
This is the color I used this time around: Jerome Russell Punky Colour in Purple
Something awesome about the Jerome Russell dye (and many others like it) is that they don't damage your hair. At least I haven't noticed any damage and believe this to be true. So, I leave my dye on for quite a while. Sometimes I let it sit for a couple of hours if I have nothing to go and do, but sometimes I leave it in for about forty minutes. Once I've reached the desired amount of time, I head off to rinse it out.

You always look really nice while dyeing your hair!
But, beware! In doing so, you may accidentally paint your bathroom, shower, or sink the color of your hair. I like to wash it out in the kitchen sink since I can control the stream more. An important step here is that you only rinse out the dye...do not shampoo! You want to rinse until the water runs clear, taking your time. Once the color is out, I usually wait for 24-48 hours before shampooing so that it has time to set. Then, you are free to wash your hair and have gorgeous color!

Because this post is getting incredibly long, I'm going to cut myself off here. But, I do plan on following this up with another post full of more tips, tricks, and useful things I've learned from dyeing my hair. Once that's up, I will link it here!

Oh, and here's my finished product!


Definitely more pink than I expected, and I may let it stay this color for a bit or may just go ahead and mix some things up for the color I was hoping for.

Happy dyeing,

Liz :)