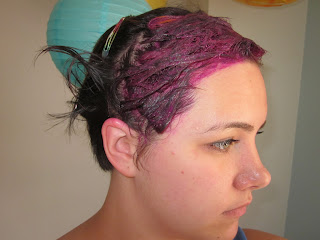
I am in no way, shape, or form certified in anything that I am going to talk about in this post. Everything that I have learned about hair dyeing and bleaching has been from watching my hair stylist do it to my hair and from other blogs or posts on the internet. I am not trained in doing hair, and I am not telling you that all of the information below will work for you! Everyone's hair is different, can tolerate different amounts of bleaching, and will take to dye differently. If you want to try out any of my tips or techniques on yourself, feel free but do so at your own risk!
Whew! Now that that's out of the way, let's get started!
So, before putting purple, blue, green, etc. on my hair, I have to bleach it. Because my hair is a very dark brown, the colors that I use will not even tint my hair if I do not bleach it ahead of time. If you are blonde, you might be able to get away with skipping the bleach step; however, that depends on the shade of blonde you are. If you're bleaching your hair for the first time, I would recommend going to a stylist so you can at least watch the process and ask him or her questions.
I use bleaching supplies that I picked up at Sally Beauty.
 |
| Plastic mixing bowl, brush, powder lightener, developer |
Once you have your supplies, then comes the fun part: deciding what parts of your hair you want to color! Because of my job, I'm unable to have totally out there hair color aka a whole head of bright purple hair. So, what I like to do is put in small streaks throughout the front section. I simply do the front because then I can see everything I'm working with, and I've come to like just having a section of hair that's colored as opposed to going all the way around my head. Now that we've got all that covered, here are the steps to how I bleach:
- Combine powder and developer in equal parts, making sure it's mixed well
- With a comb that has a pointy end, select a thin strip of hair to bleach
- Make sure the strip of hair is even and straight for ease of finding the section next time you bleach/dye
- I find that thin strips of hair work better as they look more natural blending in with the rest of your hair once colored (or at least "natural" or discreet enough that my work never cares about my hair)
- Using regular aluminum foil, place the hair on top and hold in place
 |
| You'll figure out what size of aluminum foil works for you! I use about twice the size of an iPhone for reference. |
- Paint the bleach on using a brush, making sure to cover every little bit of the hair as well as the backside (it's very important to be thorough)
- Fold the hair up in the aluminum foil and pin back if necessary
- Using the pointy end of the comb again, select another even section of hair and push to the side so that it can remain your natural hair color
- This section can be as thick as you like, working as the in between sections of your streaks
- Select another thin, even section to bleach, following the process above until you have your desired amount of streaks
- Allow the bleach to sit into your hair for twenty minutes or so, peeking at the first section you bleached for progress
- Wash out bleach with shampoo, and you're done!
So, now you have beautiful bleached hair! Sometimes you can look a little wacky at this point (at least I do)! I think it's a good thing to leave your hair at this stage for a day or two just to give it a break. However, I'm not at all fond of the way my hair looks bleached, so I am bad and usually head right into adding color. Now, here's where the process can change depending on your natural hair color. I used to resection my hair in the way that I bleach, using aluminum foil to separate the sections as I add color. However, I tried plopping the color on the entire front section of my hair once and found that my brown hair took on 0% of the color and was left looking the same as it did before. So, if you dye your hair a lot and don't want to deal with the process, you could try doing that. But, if you have blonde hair or would rather section it off, just follow the same steps as I mentioned in the bleaching segment. Once the dye is in, you simply let it wait to take to the hair.
 |
| This is the color I used this time around: Jerome Russell Punky Colour in Purple |
 |
| You always look really nice while dyeing your hair! |
Because this post is getting incredibly long, I'm going to cut myself off here. But, I do plan on following this up with another post full of more tips, tricks, and useful things I've learned from dyeing my hair. Once that's up, I will link it here!
Oh, and here's my finished product!
Definitely more pink than I expected, and I may let it stay this color for a bit or may just go ahead and mix some things up for the color I was hoping for.
Happy dyeing,
Liz :)


No comments:
Post a Comment